Creating Níla
Below is the female base mesh I created – I discussed creating this (from nothing) in the previous pre-production post.

Anatomy Development and refinement
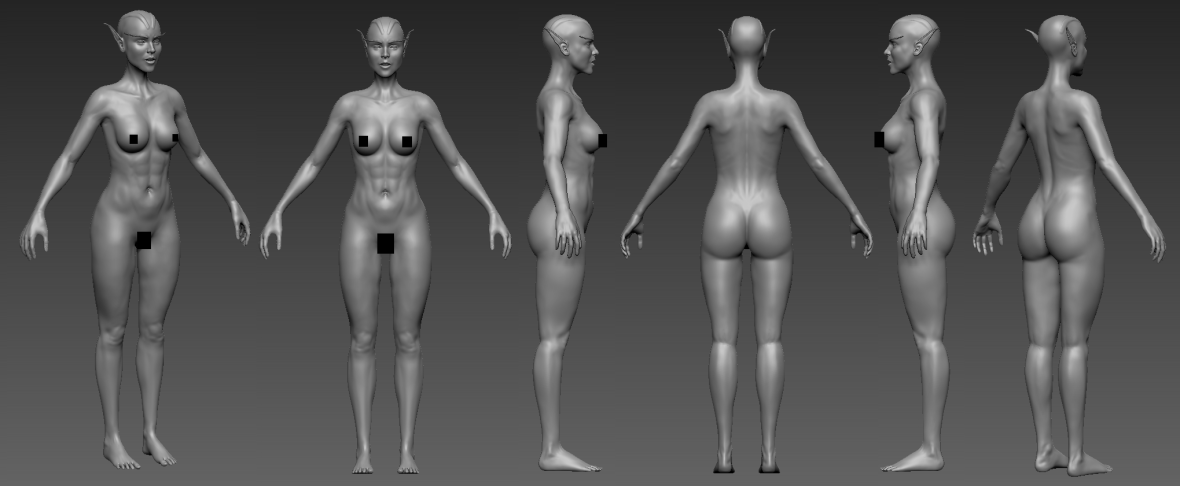
After my anatomy sculpt was finished I utilised Wrap3D and marked out the points on my mesh to transfer the topology from another basemesh. Although this was great and saved me some time, it wasn’t a perfect process and it required a few attempts and further fixes afterwards to make the mesh work. It provided a solid start to work from and definitely saved me some time. I fixed up the topology of the mouth, mouth bag, inner eye slots and the ears on the face and then I fixed up parts of the fingers and toes.
After this, I brought the new retopologised mesh into ZBrush again (after fixing the topology and UVing it in Maya) and I used the Project tool to bring back my high poly details and subdivision levels. If you haven’t used the projection tool in ZBrush before, Danny Mac explains it quite well in this video – Youtube Link

Armour Blockout
The armour blockout of my concept was reasonably quick to sculpt in ZBrush. However, there are sections that I perhaps should have made in Maya or Marvellous Designer.

Here is a reminder of my design for the armour creation.

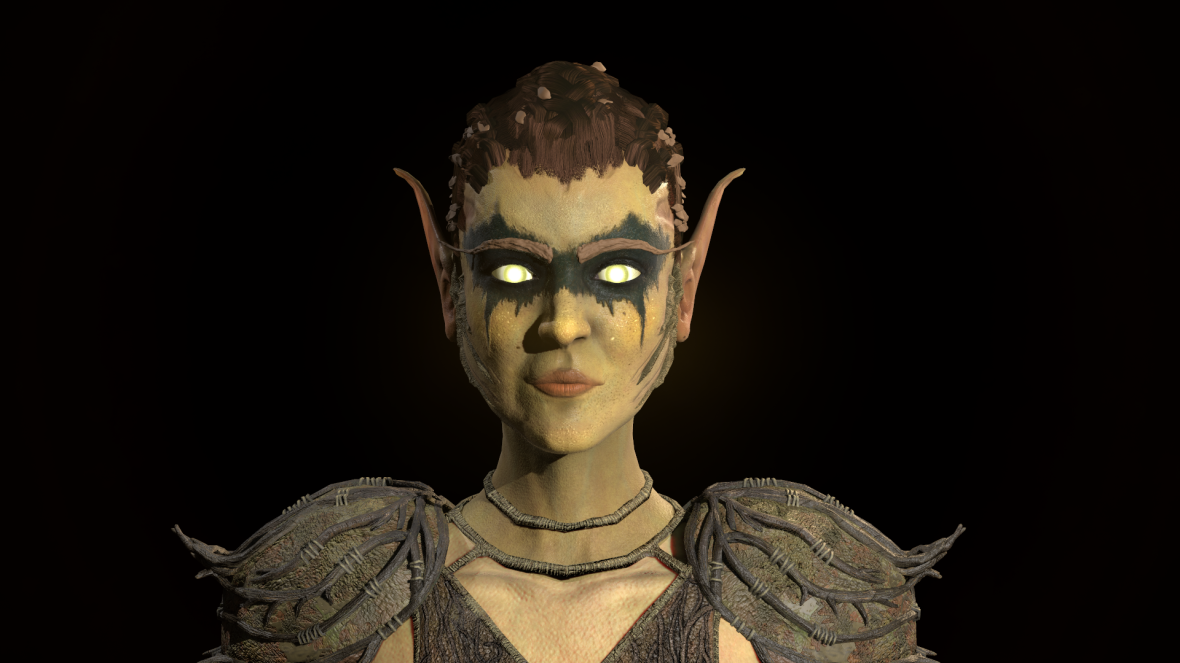
Face Development
After fixing the body’s anatomy and blocking out the armour, I came back to the Níla’s face to fix the anatomy and proportions of various areas of her face. Below is a small GIF of the development process, I learned quite a lot about facial anatomy through looking at references and books such as Uldis Zarins Anatomy for Sculptors and Anatomy of Facial Expression.

Regarding reference, in an attempt to create an athletic elven archer, I looked at a variety of female actors and fitness models such as Charlize Theron and Anllela Sagra for anatomical reference.
The primary real-life inspiration for the face was a mixture between Jessica Alba and a few other models. Below is a small snip-it of some of the facial references.
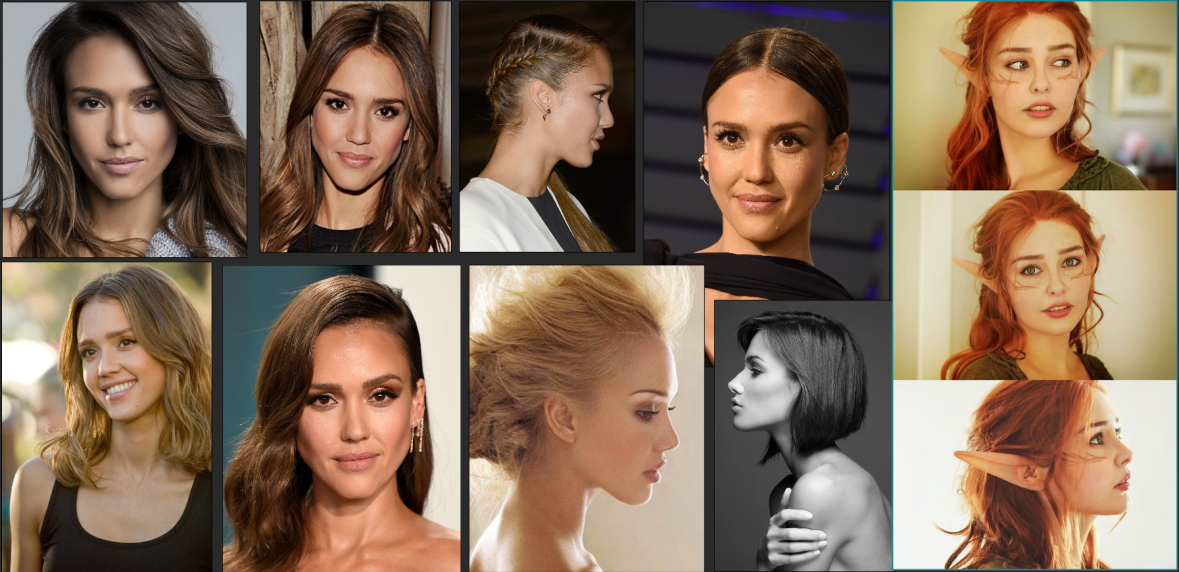
PureRef Moodboard of Facial Anatomy References
I wanted my character to have a bit more of an angular jawline in comparison to other more rounded female jawlines. I wanted to make her look tough but still keep semi-attractive qualities within the design. Although I was using particular actresses for reference I wanted to ensure that Níla wasn’t just a carbon copy of them.

World of Warcraft still remains to be a huge inspiration for me, therefore the ear shape is based primarily on the night elves/blood elves. Sylvanas Windrunner from the Battle For Azeroth cinematics has been a major influence and reference on my design both anatomically and gear-wise.

Skin
I purchased a variety of skin alphas from Flipped Normals (Flipped Normals Skin Kit) and used them for the finishing touches on the High Poly skin detailing of my character sculpt. They proved extremely useful in creating that final level of detail and I now have a better understanding of both creating my own alphas and the variation of skin detailing and what to look for in skin details. The only thing is that they were universal skin alphas and not specific to particular regions of the body.
I spent a substantial amount of time getting the anatomy and detailing right, even though the majority of it is going to be covered with gear – This further refinement was done after the gear blockout stage, hence why her chest and hips are quite compressed.


One of the most important parts was the hands, since a game characters hands are often on show and seen by the camera (first person) they need to be done right.


I found Substance Painter’s YouTube series extremely useful throughout the skin texturing process – Substance Painter Skin Texturing Series Link
(You can see the skin texture for both my characters further down).
Eyes
The eyes are composed of an inner eyeball and a cornea that create the eye. The cornea is almost purely for the transparency and reflection and to create the refraction in the iris.
I played around with the textures to attempt to create a glowing eye a bit like a night elf/blood elf from World of Warcraft as that is what I was initially planning on going for.

World of Warcraft Night Elf from BFA cinematic
I played around with a number of different versions, experimenting with different colours, iris’, sizes and patterns. But the one below I felt personally looks the best for both close ups and long shots. (Also apologies that it has the hair in it, I explain the creation of this further down).

Armour Detailing
The armour detailing took a substantial amount of time and it varied depending on the complexity of each piece of gear.
Since Níla was belongs to a tribe of elves known as the “Forest Watchers”, I wanted to ensure that the major areas of protection within her armour were made from wood rather than metal or other materials. This reinforces the tribes elvish bond to the forest spirit and that they rely upon the forest for their survival. The elves are not technologically advanced and wouldn’t have access or feel the need to forge materials out of metals and alloys.
The bracers below were the first pieces of gear that I detailed and were entirely hand-sculpted. This may look like a small piece of gear, but it includes various sections to it that went on to forge how I made the rest of the gear.
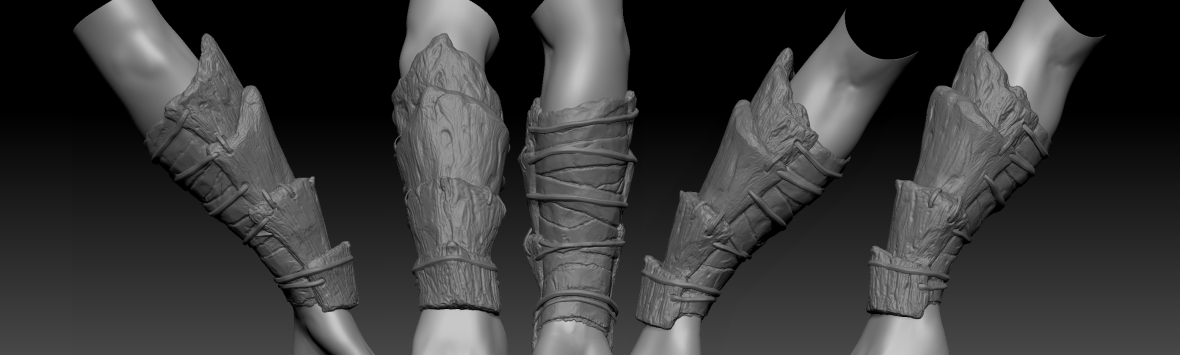
- I created the general shape of the wooden bracers with the MoveTopology tool to match the shape and form of my concept.
- The TrimSmoothBorder tool was used to create the uneven surface and scuff up the surface and edges of the wood (this brush is default to ZBrush but you have to turn it on in Lightbox Brush tab). It’s very similar to the regular Trim Dynamic tool but it gives more of an uneven organic result instead.
- I then used a variety of standard tools (primarily DamStandard) to add the wooden grain and engravings.
- For the cloth wrap under the brace I used extract tool to create it from the body mesh and I broke up the uniformity and scuffed it up as well. For later low-poly convenience I made this as one extraction rather than making every wrap it’s on segment.
- The actual straps were a combination of InsertClayTubes and just creating them from cubes and cylinders and manipulating them into place with the MoveTopology tool/Masking and Transpose tool.

In my opinion, the slight asymmetry to the gear was one of the most appealing aspects to the design. The gauntlet being one of the major parts of it. Another reason for creating the gauntlet like this was the fact that this would be her bow-wielding arm and therefore would be the arm that would be most exposed in battle. Therefore, the glove and additional braces provide more protection and support for the arm, while the other arm allows for more flexibility.
The gauntlet was very similar to the bracer in terms of creation and followed exactly the same steps. Having spent the time on focusing on hand anatomy helped dramatically in the creation of the gauntlet. I learned a lot from hand sculpting these, but I would probably use alphas in future to speed the process up.


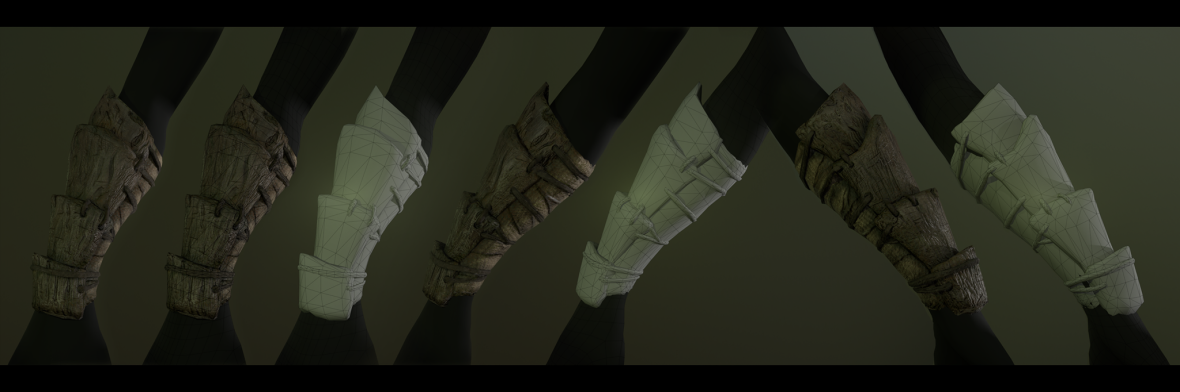
After creating these high-poly detailed versions of the arm armour, I retopologised and UV’d the wristguard. I wanted to ensure that I could achieve a high-quality bake and texture from a very low-poly mesh. Although it is quite a few polygons, having the straps as additional geometry definitely improved the quality of the armour asset.
Please check my Instagram post for a turntable of the wrist guard asset (apologies for the darkness of the renders) – https://www.instagram.com/p/B7x5VAtBoSF/.
Here is an image of the same asset (as well as it’s wireframe from later in the process – rendered in Marmoset Toolbag).


Regarding the rest of the gear, I just took them piece by piece detailing them up. (At this point I also blocked out/sculpted the rest of the facial features such as the teeth, frills, eyelashes, eyebrows and hair braid.)

The shoulderpiece and chestguard were by far the most complex pieces of the armour set to create overall.
- I utilised the InsertClayTubes to create the vines and branches that wrap around both parts of the gear and made sure to keep them as separate polygroups to ensure that I could mask them out later on during the detailing phase.
- The rest of the sculpting process was normal enough, I sculpted a few leaf shapes to create a few clumps and positioned them around the lower part of the chest piece.
After the initial creation of the chest piece, I dynameshed it all together and took it out and retopologised it as one whole piece to test whether the vines would bake to the quality that I desired. Unfortunately they didn’t, it ended up losing a lot of detail and looking very flat in the bake. Since the shoulder guard is much smaller and was going to use similar process, I decided to run my tests on it and they worked.
I combated the problem by –
- not dynameshing the asset together
- further detailing and adjusting the high-poly sculpted meshes of the vines/branches and the armour beneath them and digging some of them further into the mesh.
- giving the chest piece more UV space and retopologising the major vines/branches (this was a very time-consuming and tedious process to retopo and UV.)


Since both pieces were going to be made of pretty much the same material, I created a substance painter smart material of the shoulder piece that allowed me to have a great start whenever creating the chest piece.
I created the leaves by first creating the leaf card layout with four face planes (the same process as how hair cards work). I assembled them into their desired positions and assigned every leaf card one of three UV spaces to ensure that the final thing wouldn’t look too uniform/samey. The actual leaf texture was created using a variety of Quixel atlases as a base, splitting their textures up and editing their sizes, shapes and colours to suit my needs, I then brought them all into one PSD file and split each leaf up into a separate group compiled of all its textures and assembled them into one of three different leaf clumps (each clump positioned on one of the three UV card positions). I then brought the leaves into substance painter and baked them out again to get the new AO and give them some translucency.
Although both armour pieces resulted in taking substantially more time to retopologise and UV, I feel that their result was definitely worth it. I ensured to optimise the retopo’d branches/vines by deleting backfaces and keeping the meshes as low poly as possible to cover the branch/vine.
Creating Weapons
Initial Designs
Here’s a quick reminder of some of the base concepts I created for these. They are quite early stage concepts just to establish forms.

Dagger
I created the dagger in ZBrush in four sections – The wooden handle, the vine wraps and the inner and outer crystal.
- The Crystal was the most difficult section of the dagger (texture wise), I blocked out the shape in ZBrush and decimated it to create the initial triangulated edges, I then bumped up the sub-division levels and began sculpting in more details and damaging the edges. During the retopology stage I actually triangulated it again in Maya before UVing and repeated detailing process. The models for the inner and outer crystals are the same except manipulated to maintain the desired gap around the circumference of the inner crystal to achieve the refraction later on in the process.
- The wooden handle was the easiest part to model and was simply blocked out and sculpted in ZBrush (to wrap tightly around the crystal), then brought into Maya for retopology and UVing and textured in substance painter to match my other wooden materials.
- The vine wraps were a similar process, except I utilised insert clay tubes and other processes to wrap them around the handle and dagger and dig them slightly into the surfaces. This part was probably the most awkward modelling wise and required a lot of work and manipulation to achieve the wrapping effects without intersecting other vines or parts of the dagger.

I found an interesting article by Emmanuel Lecouturier on creating crystals for realtime rendering in marmoset. It looked stunning and it had the rough basis of the effect I wanted to achieve with my dagger.
I had made some edits to the dagger texture to make it feel more realistic and interesting. I feel I achieved the desired effect of refraction and glow that I was aiming for within the crystal itself. The glow and refraction took quite a few attempts to get right.

Please feel free to look at my Instagram for a turntable of the dagger – Instagram Link
Bow
The bow was much easier to create in comparison to the dagger. My aim was to create a new slant on the typical bow and maintain the strong forestry theme. The majority of my experimentation with the bow was to do with the concept, the bow itself wasn’t particularly complex to make. I did utilise a few tricks that I used on the dagger to speed up my process.

I felt that the design was unique and interesting and would be both fun to rig as well as references back to Wyvern with the antler shape that it creates.

I had a rough idea of how to rig the bow already, utilising IK joint chains to achieve the pull-back of the bow frame and using clusters to pull the string back. However, this video did help with the arrow and general setup – Bow Rig Tutorial.
I then added more to my rig to allow my rig to be flexible and shoot from any angle and for the front section to bend back as well (utilising the same mechanic as the rest of the frame except in reverse and at half the rate). I wanted the rig to be very animator friendly and can be easily parented to a character rig – it only has three clear custom controller and all the stretch-back features are automatic whenever the string control is pulled in any direction. The front section deforms at half the rate of the main section in all directions. Please have a look at the video below of the rig in action.
(Forgive the resolution of these videos, they were rendered with the purpose of Instagram in mind.)
Please feel free to look at my Instagram for a turntable and demo of the bow rig – Instagram Link
Quiver and Arrows
The quiver was modelled purely in Maya to ensure a low poly count. I based this design heavily of the pitcher plant (carnivorous plant) as they have an inherent quiver shape naturally, and it links back very well to the fantasy forest theme.

Here is the first pass at the textured Quiver – The top section is made with a shed plate from the Wyvern establish a further connection between the pair and the forest.

The arrowhead was be the same crystal material as the dagger and was again wrapped in vines. It followed a very similar process of creation as the dagger did.


If I have time, I hope to make the Leech Grapple Arrow shown at the bottom of the concept piece I posted at the beginning of this section. The primary reason for this is that it would be another carnivorous plant-based part of her kit and I feel it is a unique design and it would again be quite fun to rig.
Creating Estrel
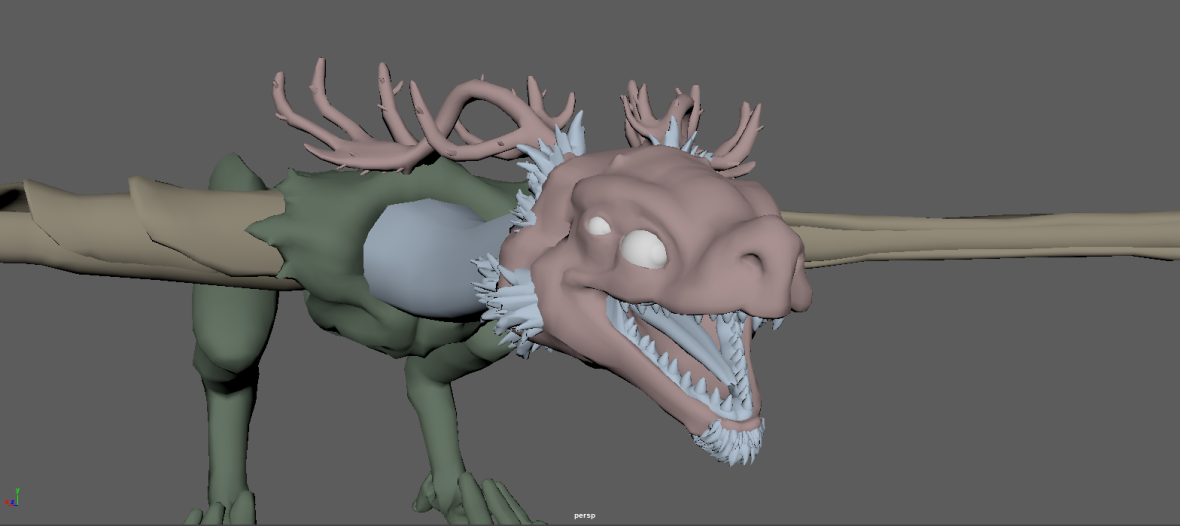
Wyvern Intial Blockout
Having the blockout made from my concepting stage did serve useful. However, it needed significant reworks to make it ready to be worked with. The face was one of the major reworks. The rest of the body was created primarily with dynamesh for the concept. Therefore, it had to be rehauled significantly to make it ready for developing.

Retopology
I re-did the majority of this in Maya during the retopology stage as I felt this was the most time-effective method. The retopology stage took about a week, it was substantially faster than Níla’s retopology even though the Wyvern is substantially larger. This was primarily because Níla had a lot more to retopologise regarding her armour and body topology, I also had improved quite a bit from doing all this.

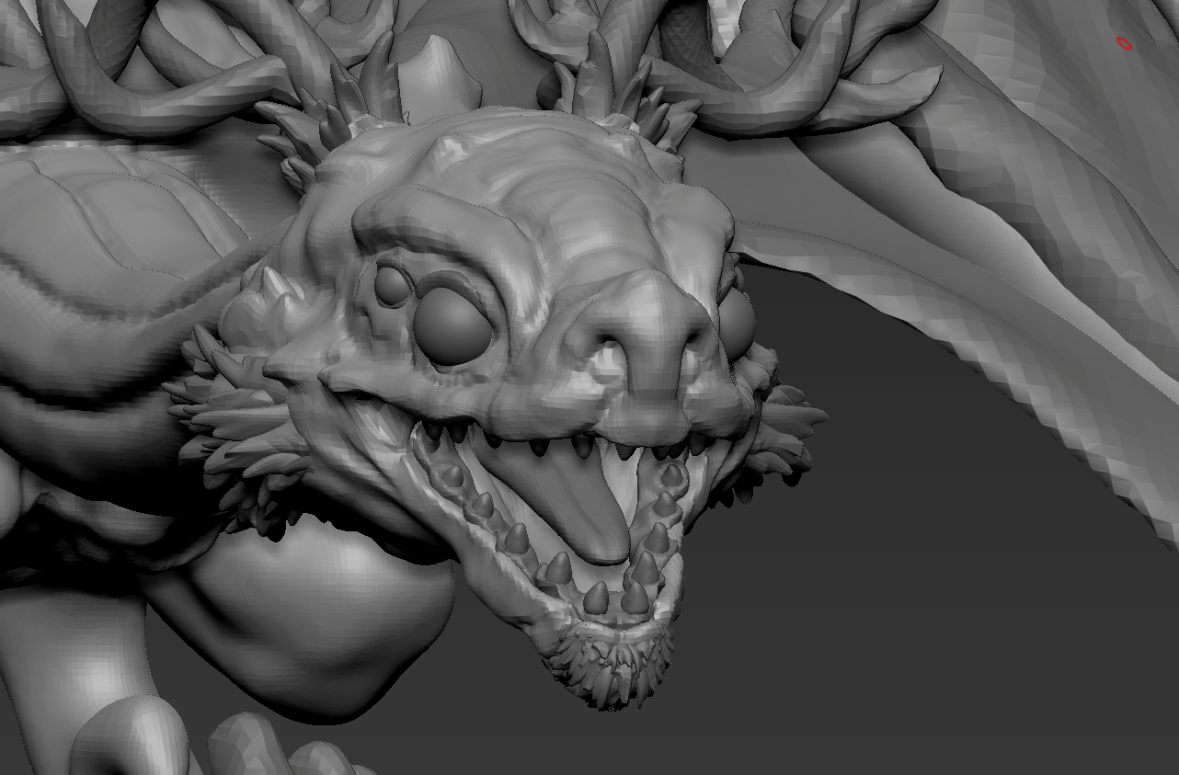
High Poly Sculpt
Creating the high poly version of my Wyvern (Estrel) was one of my favourite parts of the project, seeing a fantasy creature that I created come to life with every stroke of my graphic tablet pen (and all the retopo/uv’ing was already done).

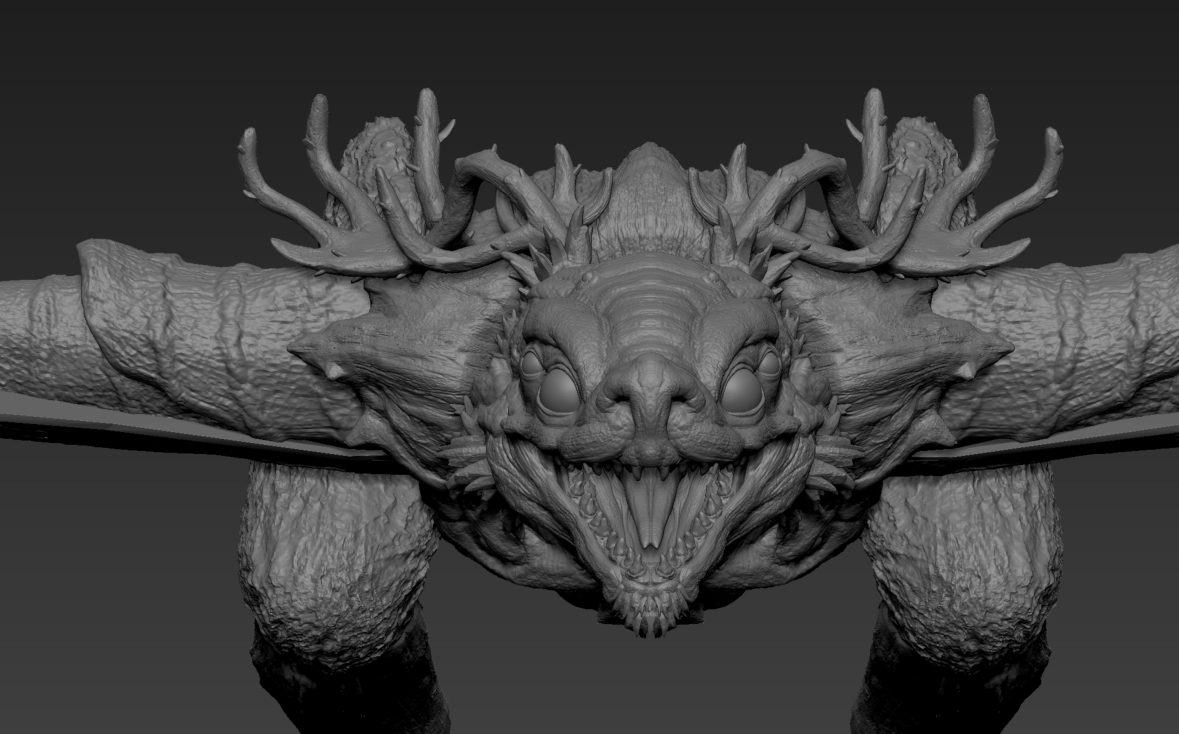
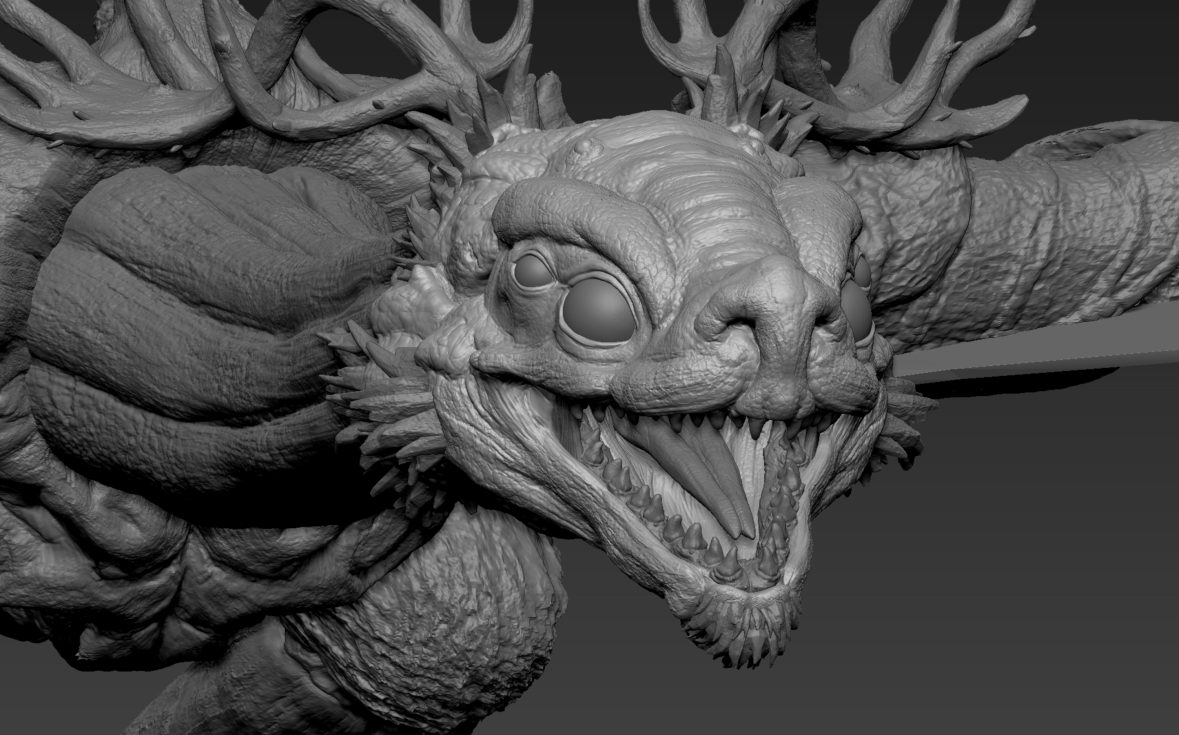


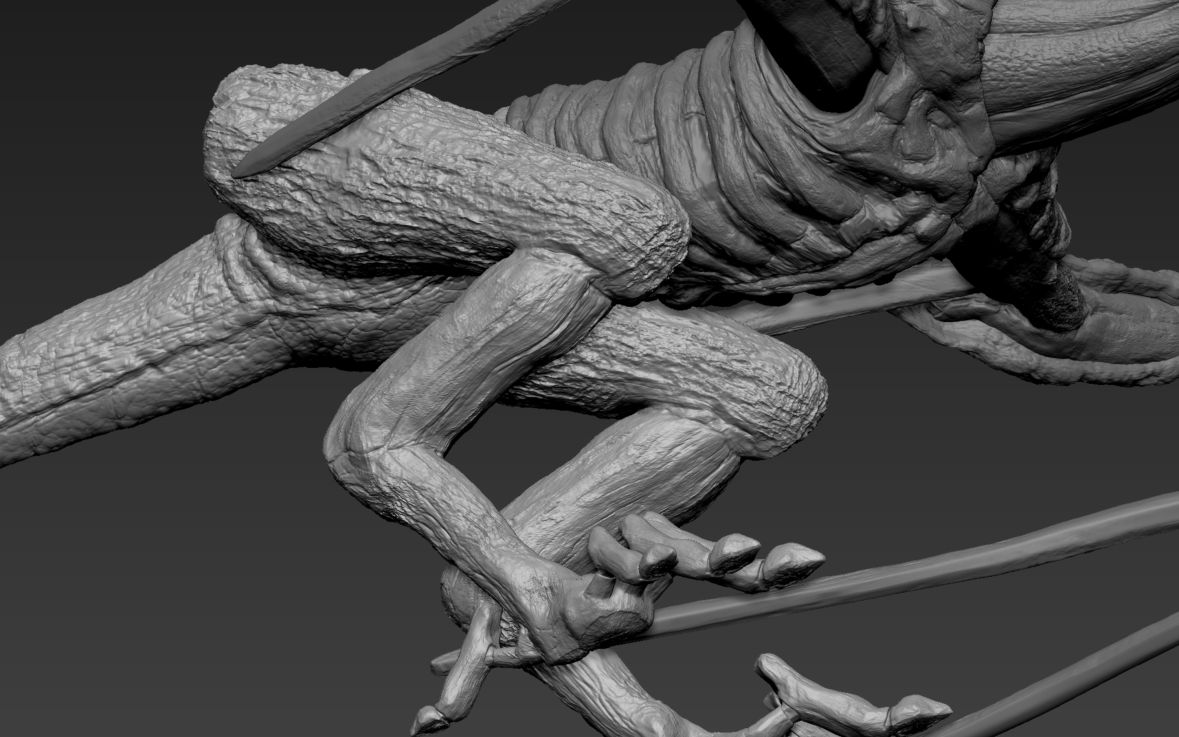


I’m very pleased with how well the high-poly came out and I feel that I achieved the look I was going for in the concept.
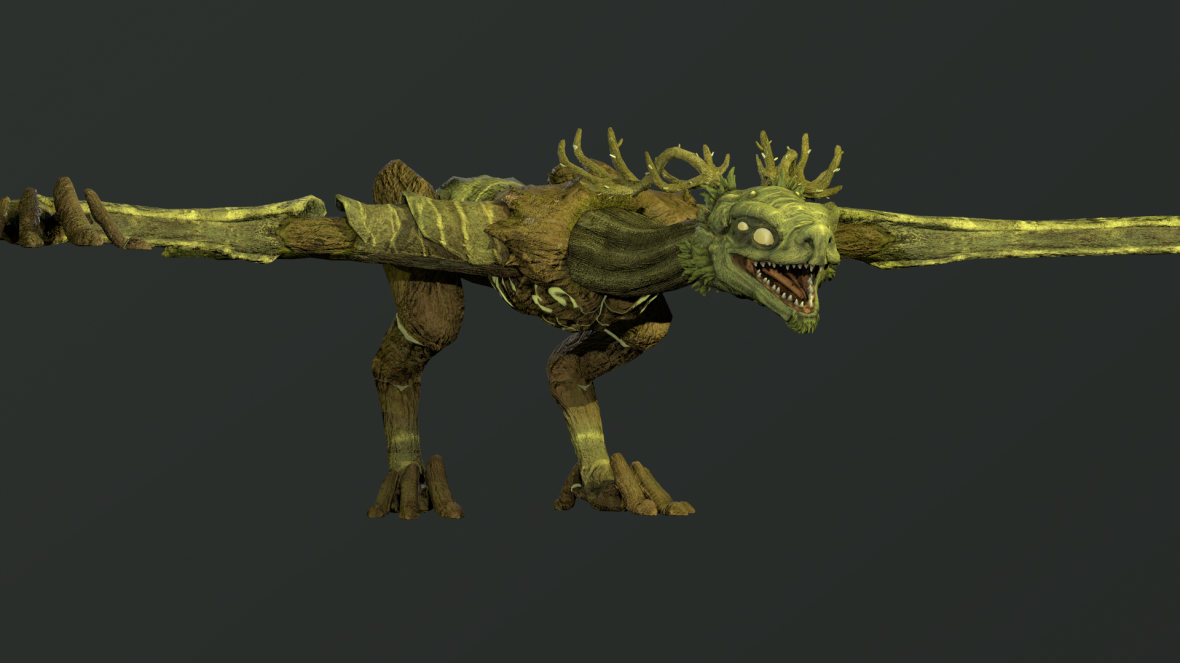
Texturing
I am aiming to achieve a high level of detail with this creature but still aim it for games. Therefore, during the UV process I split the Wyvern into 5 material IDs and to further conserve on UV space I made the wings mirrored versions of each other. Regarding the eyes, I am keeping the same as Níla’s to further establish their bond from birth, so the materials are already created for them.

The majority of the detail is coming from my high poly ZBrush sculpt, I spent a significant amount of time adjusting the forms, adding skin scale details, sculpting wood grain and the transition between the different types of skin (wood to scale to vine to reinforced leaf skin.) I am very pleased with how the Wyvern ended up turning out and although I lost some detailing in the baking process, it transferred across much easier than Níla’s high poly to low poly bake did.


After texturing the body and frame of the Wyvern, I moved on to modelling and texturing the wing and tail membranes again, ensuring that vertices around the edges of the membranes all lined up with the wing strut edge loops, to make the skinning process easier later.


HAIR
The hair was something that I wasn’t looking forward to as I hadn’t got a major amount of experience with XGen or female hair styles for that matter. Therefore, to achieve the braid that I was wanting to make I looked at a lot of reference, ranging from loose braids to cornrows. Another problem that I was facing was the fact that this Níla is intended to be a game character – therefore, the hair would have to be made from pre-rendered XGen strands and placed manually in hair cards.
I found a very useful marmoset page by Emmanuel Lecouturier on creating a sorceress character that went into quite a bit of detail on the hair card creation process – https://marmoset.co/posts/presentation-lighting-and-hair-creation-for-a-sorceress-character/
The following tutorial was extremely useful as well for the process of creating the hair in Maya using XGen.
This was extremely useful and I tried creating a hair card early on in the semester the process worked.
I found the results to be reasonably decent and reasonably easy to edit in Photoshop afterwards (colour wise).
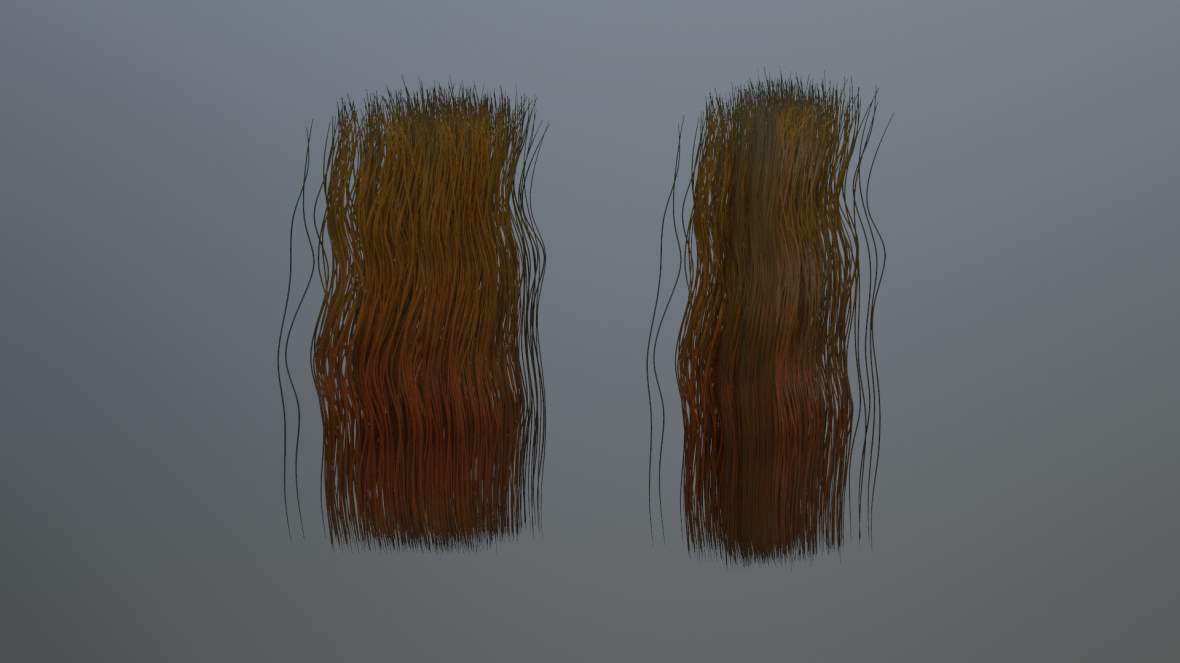
After creating these hair cards, I decided to stray away from the crazy gradients and variation that I had within my initial concept as this would involve more materials for the various sections of the hair.
I then proceeded to make a UV sheet worth of different hair strands, including –
- Base hair
- Small break-up hair
- Big break-up hair
- Flyaways
- Transitional hair
- Braid tails

I rendered out 5 different maps from my Maya file – Albedo/Ambient Occlusion/Direction/Normal/Opacity (Alpha).
The Direction/Normal/AO required different materials to be set up and applied to them in order for the Arnold renderer to pick them up.
Before finishing the sheet I decided to begin placing them to ensure that the hair strands would work for what I needed.
I brought in my ZBrush hair blockout and started laying out the base hair (base hair card) –
Below is the base hair I created in ZBrush – I checked it against the lowest poly count on the head subtool to ensure that it worked and didn’t intersect through the hair.


I worked from one main hair card and manipulated it into various positions around the base of the head. Afterward I started playing around with the main braid – It needed adjusted from my initial ZBrush blockout as a straight chain is more appropriate for rigging (rather than the over the shoulder braid tail).
I began by placing cards into the braid the same way that I had before. However, this was a very slow process and wasn’t yielding the results I wanted. Therefore, I decided to experiment with adjusting the ZBrush ZRemeshed braid mesh, I retopologised some of it and deleted a lot of edge loops as well as the backfaces to make them into curved hair cards – after figuring out this process, the UVing was the most tedious part (since Maya’s transfer attributes treated them as different meshes). As with the hair cards, these UVs had to be flat and layed out straight to ensure the flow of the hair would be consistent and visibly look like a tight braid. Below is the result of this on the main braid itself.

Image of one of the side braids – 3/4 angle
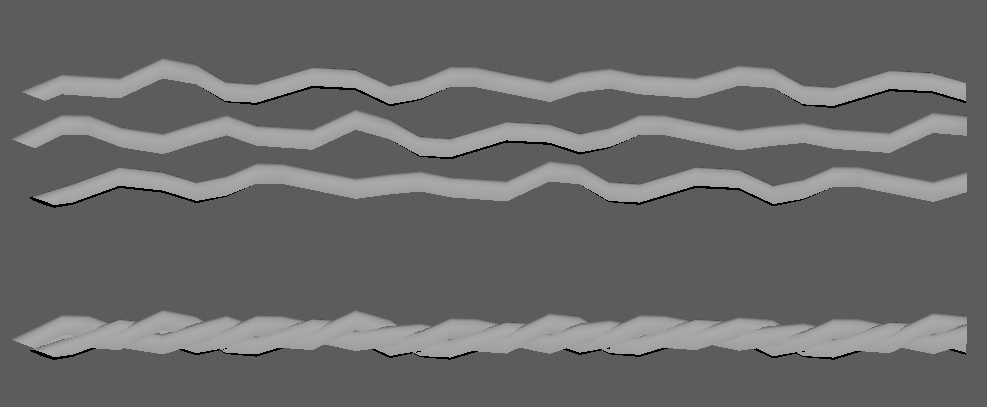
Image of one of the side braids – side angle


I created an entirely new mesh for the side braids since they were a different type of braid. Having learned from the main braid, I decided to make them in three long tubes that wrapped around each other (the main braid is made of around 30-40 separate sections all wrapped round each other). Therefore, the secondary braids (six in total) are made of three tube-like sections coiled around each other. The underside faces have also been deleted to reduce the poly count slightly.


I UV’d each tube into three different sections to keep high texel density throughout the braid. The cuts in the UVs are positioned in dipped areas in the braid that are almost entirely hidden from the exterior head shot in order to hide the UV seams. Furthermore, to avoid repeating textures, I positioned the UV sections in slightly different places along the hair card.
Below is the first rough pass at the hair style for Níla that is only using the base hair layer of the hair card – the leaves (the untextured parts) are still to come and I will be adding more of them throughout the hair.


I’m reasonably happy with the first pass of the braids, I’m glad they are coming together and should only look better once I add the secondary and tertiary layers of hair to them.
I created leaf cards using Quixel leaves as a base for the textures. After editing them, I added them to my set of hair card texture maps and began positioning them around the head. The Quixel maps came with albedo/AO/normal/roughness maps, I edited the albedo to give them my own take on them. I created an alpha (opacity map (5 from the image below) from my new leaf based on the new shapes. Instead of generating a direction map, I used the alpha/hair direction map and leaf normal to make my own. To create the leaf direction map, I made a base direction map from the main hair strand (filling in the gaps in the hair) and used the alpha shape as a mask (Ctrl+Alt+G). I then used the leaf normal map (4 from the image below) as an overlay and multiply layer to extract the detailing from them, but not the normal colour. I found this to be very successful when creating the direction map.

I setup my hair cards in Marmoset to ensure it would work for realtime rendering.

Here are a few shots of the first version of hair and eyebrows – I really liked the elves from World of Warcraft and I thought their eyebrows were very cool and added to that fantasy element. That’s why her eyebrows are much longer than regular eyebrows.


RIGS
Níla Rig
I decided to experiment with MGear for rigging Níla – MGear was entirely new to me, but I felt that it would be worth a shot to speed up the generic bipedal parts of the rigging. The rig did require quite a few attempts to make it work, but after getting the hang of using some of the features of MGear, it produced some really nice results.
I ran into a number of errors with MGear and unfortunately I didn’t have the time to re-rig the character. However, I feel that I would potentially avoid using MGear and rig the characters manually.
- Since MGear is required to create the rig, the rig can not be used on computers without the MGear plugin.
- I found it giving me various errors related to the plugin that since I didn’t manually create the rig, I struggled to find out what the origin of their problems were – and the resources/information online related to MGear is very limited.
- I could perform various manual rigging strategies on it and a lot of the online resources for MGear recommended using various other plugins for other aspects of the rigging process. (An example of an error was not being able to right click on the skinned mesh to select vertices of on a joint to select it as an influence while skin weighting). I would frequently get this line of code when trying to select the mesh even after detaching it from the rig – “# Error: UnicodeEncodeError: file D:\mgear_3.4.0\InstallmGear\scripts\mgear\core\dagmenu.py line 343: ascii”.
After setting up the mGear rig itself, I added various other sections to the rig manually, including – shoulderpad controls, tabard controls, leaf skirt controls, hair controls and most importantly weapons controls.
The weapons were rigged separately then imports into the Níla scene (which would later be used as a reference for my animations. I created blends using animation constraints and set driven keys to allow Níla to pull back the string of the bow and it be able to fire an arrow.
The most difficult part of this rig was the skinning – this was due to the complexity of the character and the amount of polygons required to achieve the level of detail in her body and armour (primarily in the chest piece and it’s retopologised extra vines and leaf cards). I had several variations of rigs initially just in case one broke, until I just rehauled the entire skin weighting, split the meshes into various sections and manually fixed it myself piece by piece. (Also meaning that I lost all the previous blendshapes since the meshes were no longer technically the same – which was very irritating).

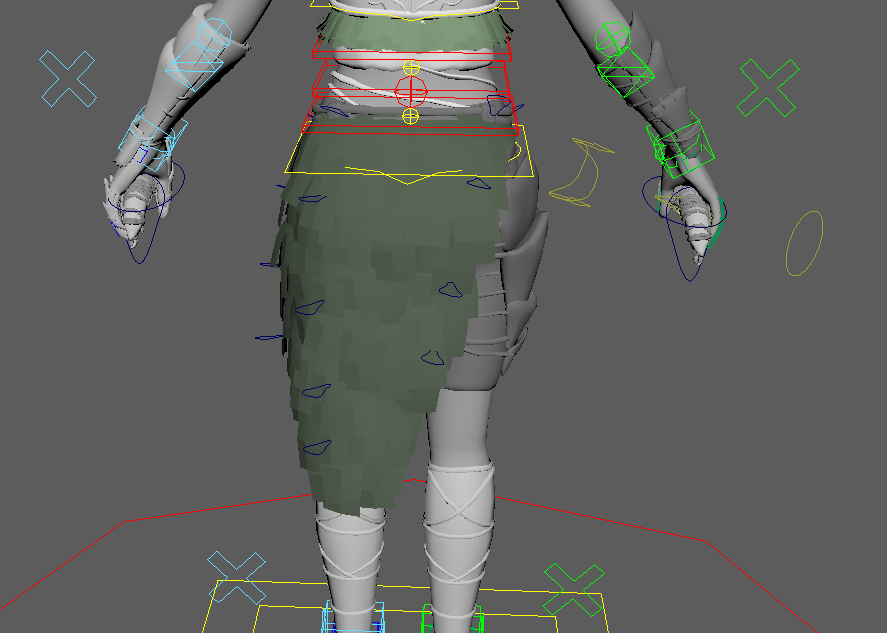
Rig setup for Níla
I have set up the rig with blends to allow the string to be pulled back and released and be able to go in between the two states wherever necessary. (shown below).


The rig also has weapons attached to both hand that can be turned on and off depending on how or when they’re required.

The front tabard/loincloth and rear leaf skirt are attached to the rig and have several joint chain running up them. To allow them to be controlled by the animator depending on the pose or action that Níla is in. These are also connected to the hip joints allowing them to follow through the animation from their parent (keeping them in the correct position in relation to the belt and leg gear at all times, unless the animator doesn’t want them to be).


The chestpiece was the most annoying the skin weight due to the all the retopologised vines wrapping all around it. However, after a lot of manual tweaking to skin weights it works very well.

The hair is also attached, and skin weighted well to the head to ensure it the head mesh doesn’t intersect with it. The hair tail is also rigged alongside the shoulder pads.

You can see the rig in action in later shots, also it attached to the Wyvern in a mounted position.
Estrel Rig
Estrel was entirely manually rigged as I wanted to be able to control all the aspects of it and know exactly what the rig could do and if any errors came up, I wanted to know why they were happening (this was something that I didn’t like about using MGear and some errors with it would require a good bit of research to fix). I felt manually rigging it was the best solution as I didn’t feel overly comfortable with other rigging plugins/auto-riggers like Advanced Skeleton or M-Gear for a non-generic rig like a Wyvern.
The Wyvern was split up into about 6 main different sections in the retopology stage to aid in the rigging stage –
- Chest
- Rear legs and tail)
- Wing frames
- Head
- Neck
- Wing and tail membranes (wing webbing)
Overall, the Estrel Rig took me about a week to create initially. I made additional tweaks to the rig as and when I needed them (e.g. remaking the leg so it had an IK/FK switch and giving setting up additional space switch controls to the fingers and toes, and that sort of thing).
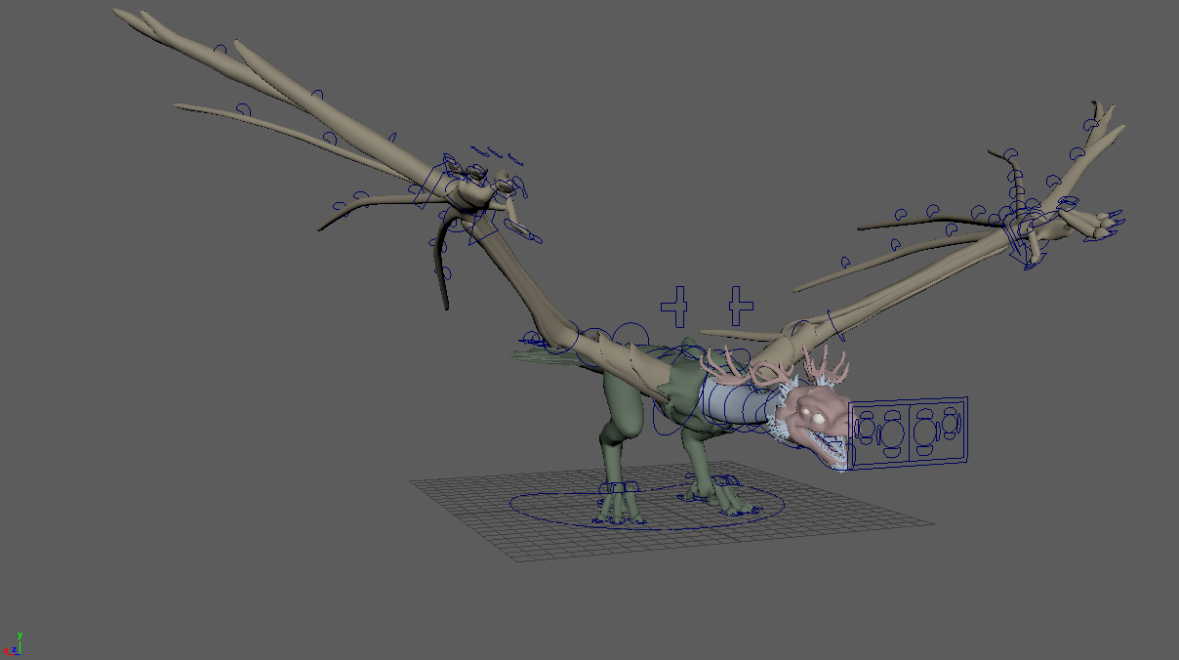
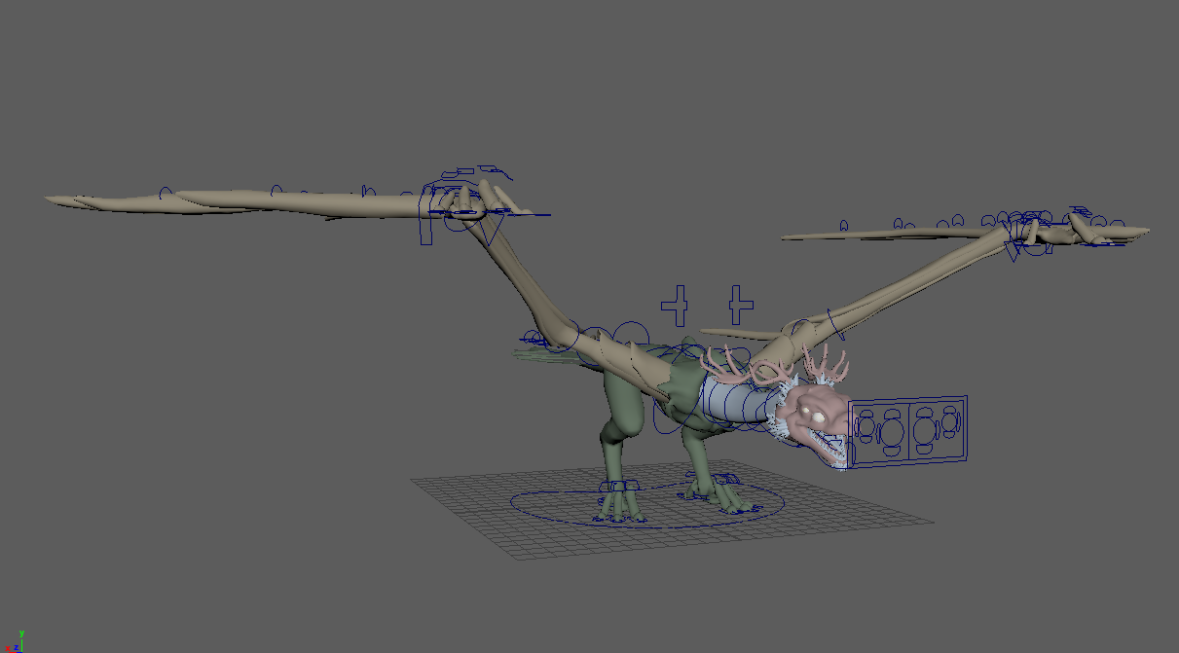
Joint Skeletal Setup
Below is the initial joint setup for my rig.

I decided to attach the wings/neck to the chest with locators and the same with the hands to the wrist and the head to the neck. This allowed me to create follow through ctrls – allowing me to control whether the “child” followed the orientation of the “parent” joints, this is useful for controlling the rig in different ways depending on whether it is flying or grounded. For the head it allows me to use the rotational value of the neck or have the head focus on something independantly.

Control Set-Up
Wings –
- The arms are controlled either by IK/FK controls and have additional controls for follow through controls, world space controls and rotational controls.
- The wing struts (/fingers) are controlled by FK systems with BlendColor node networks to automatically calculate and control the membranes in between.
- The fingers are controlled with IK controls.
Head –
- The neck and head are controlled with FK controls and also have additional follow through rotational controls.
- The eyes are controlled with a point constraint alongside three blink controls.
- The mouth and tongue are FK setups.
Body and Tail –
- Spine IK setup
- Leg IK/FK setup (with blend switch) and individual toe IK setups.
- The tail is an FK setup and the membranes are done similarly to the wing membranes.


Eyes
The eyes are fairly normal process, I setup a control to allow the eyes to all move independantly and I used two controls per eye to manage a top and bottom eyelid movement, allowing the eyelids to open and close. I also added a third locator to control the third eyelid (various lizards and interpretations of dragons have three eyelids e.g. Smaug from The Hobbit).

Smaug from The Hobbit blink GIF.
The eye ctrl setup allows all four eyes to be controlled simultaneously, individually or by the left/right side. The ctrls above and below the eyes are the top and bottom eyelid which are controlled by a single translate value. The side ctrls are for the third eyelid and it controls the rotation value of the third eyelid mesh.

Eye Ctrl Set Up
Wings
The most complex part of the Wyvern rig was by far the wings and their membranes, unfortunately every step had to be repeated on the other wing.
IK/FK Wing Switch
I began with creating an IK/FK wing switch to allow the wings to be operated from the hand or at each of the main points of the wing. I have set up IK/FK switches before but I stumbled upon this method by Dikko and it was great. Utilising the node editor and BlendColor nodes made this process much cleaner, clearer and faster than any of my previous methods.
Shoulder and Hand follow through – set up with locators and keyed parent to control translational and rotational constraints. This allowed for the shoulder to rotate independently from the shoulder/chest, this would be useful for controlling the wing while flying or whenever it has landed (and the same for the hand rotation from the wrist). It just allows for more control with the wing.
Below is an example of the hand follow through control on and off with the IK wing arm.


Below is an example of the hand follow through control on and off with the FK wing arm.
The shoulder/neck/head all have the same setup to give the animator more control over direction whenever the Wyvern is flying and/or landed.
IK space switch – set up with groups and keyed parent constraints allowing the IK wing to be controlled by the shoulder, the root and the world space of the rig. This was to allow for some more control as well so that the IK hand control could work both independantly and in conjunction with the shoulder, root and world space – mainly to aid in flight/landing.
Attaching the elbow strut/finger to the wing – I used a Point on Poly Constraint to attach a locator to the mesh. I then constrained another locator to the first locator with a keyed rotational constraint and then constrained the ctrl_grp of the elbow strut to the second locator. This ensures that the elbow control although it is a separate mesh always follows the wing frame in the correct place.

Wing membrane attachment
The wing membrane section of the rig was the most time consuming part of this rig to get right…

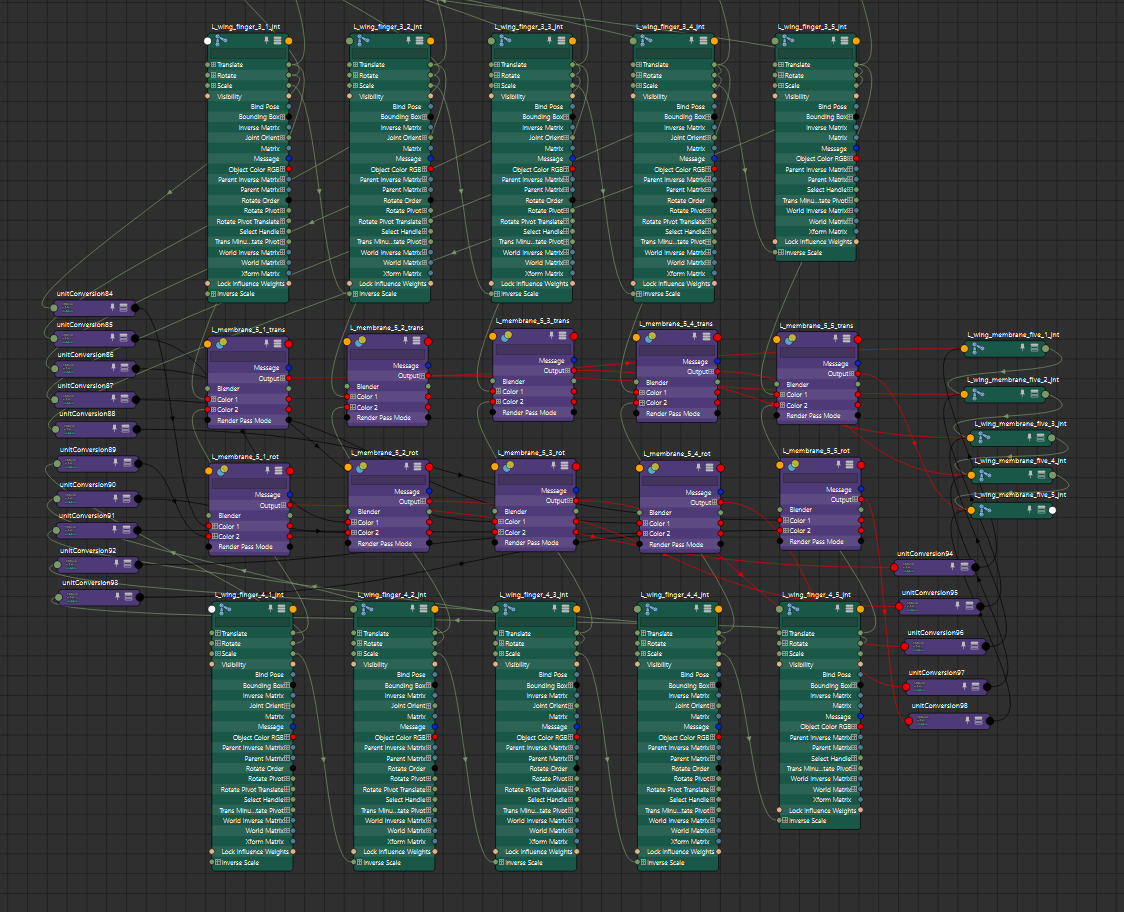
Three outer membranes – This process took a bit of while to figure out but once I figured it out, it was grand. For each membrane I used the outer two wing strut (finger) joint chains to control an inner joint chain using a blendColor node network, I adapted this process from the IK/FK wing switch method. Below is the node network setup for the three outer membrane sections on one wing.

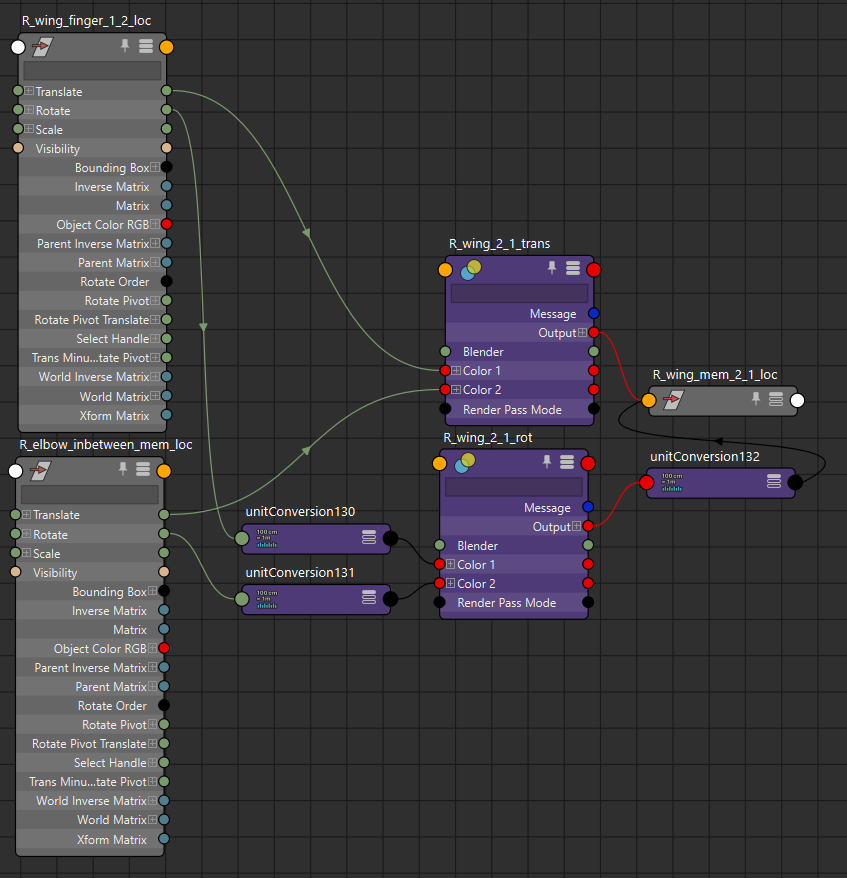
This is a close up of one section, the process is relatively simple. To make a result joint between two joints, I took two BlendColor nodes and plugged the translate values of both outer joints and plugged them into the first BlendColor node, the result from that node is then plugged into the result joints translate values. The process is the same for the rotate values, except they are plugged into the second BlendColor node.
After finishing this process for three (five part) joint chains, I moved on to skinning the three joint chains to the corresponding wing membrane mesh. The skinning values had to be exact though in order to avoid both clipping and the wing membranes separating from the wing strut (fingers). Therefore, using the component editor I had to manually adjust the values of individual vertices to ensure this didn’t happen whenever the wing was moved. The outer part of the membrane was directly attached to the outer wing joints and vice versa with the inner membrane and membrane result joints, then the vertices in between were set to half the rate of the two joint chains on either side. The skinning was by far the most time consuming part of the rig.
Two inner membranes –

The inner membranes were slightly different and since the joint chains had different origins and amounts, I decided to generate their result values using joints constrained to locators instead.
For the first membrane I firstly constrained locators to each part of the elbow strut joint chain, then I used Point on Poly constraints to ensure that the locators attached to the body would stay with it all times. I constrained a joint chain to the chest locators and then repeated the BlendColor process with locators to create the membrane blend chain and constrained a joint chain to the result.
The second membrane was a similar process with locators, however, since this membrane was attached to three joint chains I had locators attached to the outer wing strut, the elbow wing strut and the arm joint itself. This was the most complicated membrane to set up and ensure that the resultant joints behaved correctly.

I repeated the same process as before with the skinning (it was a very monotonous and time-consuming process).
Below is a posed textured version of my rigged Wyvern in Marmoset Toolbag 3.


After running a couple of animation tests on this rig, I went back and added an IK/FK leg as well, it proved a little more awkward since I already had the leg rigs already set up. However, I was able to detach them, remove all the constraints and keep the skin weighting. I made the skinned joint chain the resultant leg chain and then I created an IK and FK leg set up afterward and used the BlendColor node network approach again. While doing this I added the foot follow through and an overall foot control. During this stage I also added a world space and foot space control to each of the toes, so it can lift the arch of the foot from the ground without the toes positions moving (this was mainly for take-off and landing that I added this in).
In comparison to the Níla rig, the Wyvern rig is much easier to use, I found almost no unusual errors while creating it and I was able to control every section that I desired to. The skin weighting process again was much easier due to this.
ENVIRONMENT and ANIMATION
The environments aren’t the main part of my project, they were just a bonus that I wanted to add. I intend on rendering a lot of my shots against plain/black backgrounds to ensure the focus remains on the characters and animations – as I feel this is the best way to show off my characters. However, environments are cool, so I made a few inside Unreal Engine. I wanted to take the characters right the way through the game pipeline which is why I rigged them so extensively. I wanted to use animation to properly show them off instead of just posing them in one position, I wanted to pose them in multiple positions easily and breath life into them through (game-style) animation.
Environment
My first proper environment test was for my Instagram post on the Final Year UUB page.
I have to say Unreal Engine’s controls and UI were difficult to adapt to at first. However, after getting a bit of a gist of how to import assets, edit materials and the general navigation it became much easier.
I only started learning Unreal Engine a week or two before this Instagram post was created and I was very unfamiliar with it and I had set up the cameras/scale wrong and my camera wouldn’t port in from Maya properly. The lighting was another issue that I was facing with this large scaled scene, it refused to bake on any lighting setting. Therefore approaching the date my Instagram post was due, I decided to create the foreground in Marmoset and render out a shot from the background and just trick the camera in Marmoset.
One of my main inspirations for environments was Avatar, it has absolutely stunning environments.

Avatar – Image sourced from Pinterest
Obviously, the environments aren’t the primary part of my project, therefore, it won’t be the main focus and (obviously) won’t look as good as Avatar. However, I did want these planets in the background of my shot. David, a friend from class, directed me towards a great planet tutorial that would give this sort of effect.
After a bit of tweaking, this gave a great result and really added to the scene.

I created the trees using SpeedTree, I found the UI a bit awkward but the amount of customisation possible with it is very impressive. However, I was just using a free version, so I didn’t have as much variance available. I followed a tutorial similar to this one below, but I was limited to the free versions capabilities unfortunately.
Another plug-in that I invested in was a Brushify pack by Joe Garth, it was very beneficial for creating the base landscape materials (even though you can’t see them much underneath the trees) and sped up the workflow substantially.
I made a small 6 second or so idle animation for Estrel and ported it into Unreal Engine as an alembic to ensure that the animation, materials and meshes all worked. Below is a test in a river environment I created using quixel assets. The environment below was my second proper environment test, I wanted to make this in a smaller more confined space and I felt that a shallow river chasm was perfect and displayed it well.
This shot above initially was having an issue with lighting/exposure, it’d look fine in the viewport of both the camera and play mode. Whenever I rendered the shot out the lighting substantially changed throughout the 180 frames I was rendering. It ended up being an issue within the exposure in the camera, post-processing and settings. It took a while to figure out.
Animation
As I mentioned previously, I wanted me Wyvern rig to be able to be walk while landed, able to fly and do the transition between. Therefore, after adding the leg adjustments I made a few edits to the rig and created a test flight animation.
Below is the same animation except rendered (realtime) in Marmoset Toolbag 3.
After creating this I wanted to add the Níla on to the back of the Estrel and create mounted animations. As in a game, as a Wyvern Rider this would be important. Therefore, using locators I attached the Níla rig to the Estrel rig with a point on poly constraint to ensure that the base would stay in the same place throughout an animation. However, I attached this to the local move control so if she did need to move her position on the back of the Wyvern she could.
This was the next animation I created, a mounted walk cycle. Which regarding game animations would be very important, the next grounded animation I plan to try is a mounted run cycle.
Here is the same animation rendered in realtime.
As we all know full well, Wyverns aren’t real creatures, so there isn’t any way of capturing real reference of one. Therefore, I ended up having to get on my hands and knees (sometimes even just lying down on a table to pretend I was flying) to act out some of the animations that I wanted to create and get into the space of a Wyvern.
In saying this, dragons, wyverns and wyrms are popular creatures to create within games, films and tv. Therefore, there are a few great sources for dragon-like creatures, the main ones I found to be the most useful were –
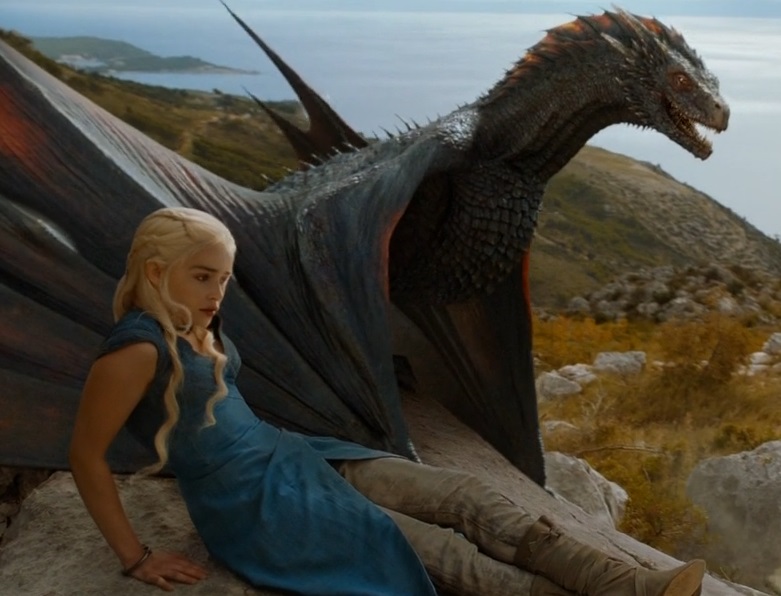
- The Game of Thrones (GoT) Dragons (which are actually Wyverns) – “The main difference is in the fact that the wyvern only has two legs (plus the winged arms), while dragons have four (plus the winged arms)”

Game of Thrones Dragon – Fully Grown
Game of Thrones Dragon – Young Adolescent
My Wyvern is probably around a mid-adolescent state in relation to these images.
- The Wyverns from Ark: Survival Evolved

Ark: Survival Evolved Wyvern – In Flight
- Dragon mounts from games like World of Warcraft
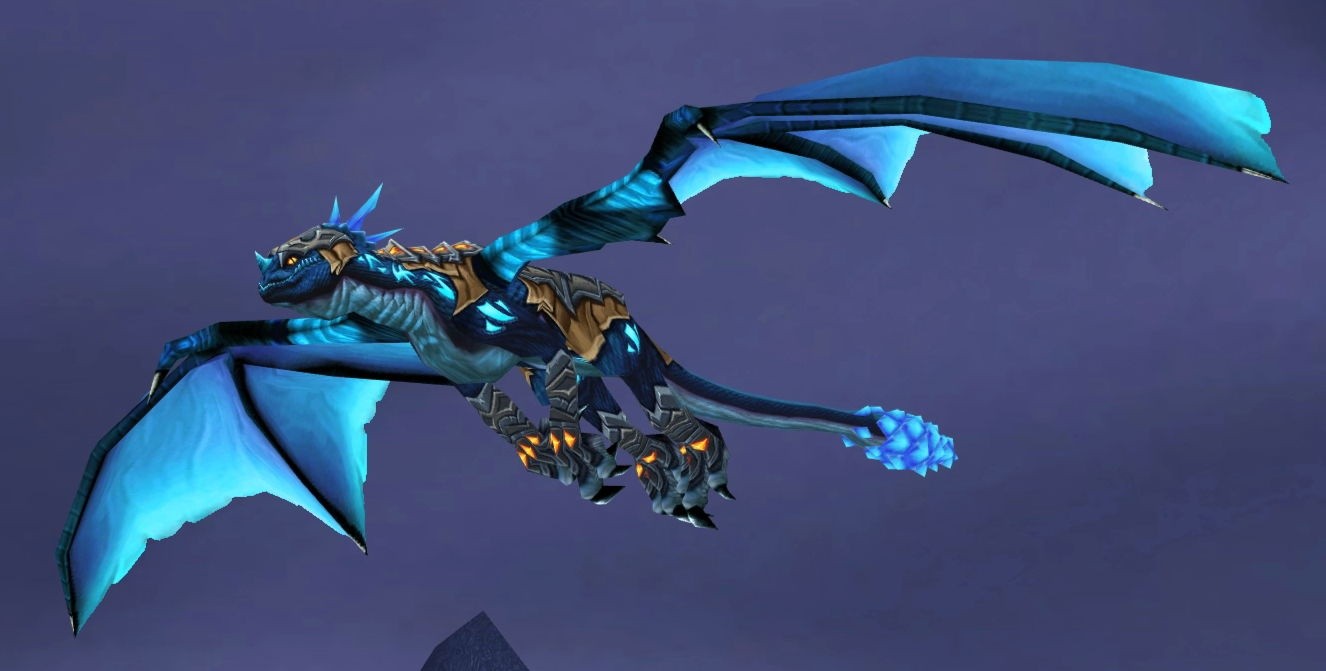
World of Warcraft (one of many) Dragon Mounts – In Flight
MOUNTED IDLE FLIGHT
Having played many hours of games like Ark: Survival Evolved and World of Warcraft throughout my youth, I knew exactly what sort of animation I was going for with this one to start with. Therefore, I created a quick reference video of myself and then got started blocking the poses and getting the initial timing right for this. While creating this animation, I found a great reference for this from GoT – from roughly 1:15 to 3:00 there are intermittent shots of one of Daenerys’ dragon flying while attached to a chain.
Below is the final animation for the idle flight cycle that I created – rendered in Marmoset.
MOUNTED FLIGHT (IN PROCESS)
This is a fixed (and mounted) version of the flight test I did earlier at the beginning of this animation section. I wanted to add moderate wind to make it feel different to boring calm flight cycle and to show off the membrane controls a little more.
MOUNTED RUN CYCLE
Run Cycles are a good bit more difficult that walk cycles and to get the pacing right took a bit of time.
A Wyvern running was very hard to find reference for, I struggled to find the right kind of run in GoT. I looked into games then and it was difficult to find good quality video reference of Wyverns running as the majority of the videos captured them flying. I found one for Ark that I found slightly useful, however, it still isn’t great quality or a good camera angle at all – https://youtu.be/qIJH8u_DOfY?t=690
I then began looking at animal references and the sort of run cycle I wanted to create, leading me to Aaron Blaise, a highly skilled animator. He was creating a side profile run cycle for a bear and I found this very useful (about 2 hours in).
Here is the first pass of this animation, this animation was the hardest one so far… To get the pacing right, make the weight come across and remember all the different secondary motions – all while making sure not to exaggerate it too much so that Níla doesn’t look like she’ll get mad motion sickness and is still in control.
I found rendering it out helped me see mistakes easier as well – with Marmoset able to render out 300 frames of this looping animation (at a high quality) in less than 10 minutes made this render test possible. Overall, I’m reasonably happy with this animation and the main areas to fix are regarding the wings secondary motion and possibly its elbow movement. I have fixed the majority of these problems and they can be seen within the final version of my major project.
IDLE COMBAT and ARROW SHOT
This animation was primarily to show Níla wielding her knives. The vine-wrapped amber dagger was my favourite weapon that I created for this project. Therefore, I wanted to create a quick animation of Níla using it even if it is in a crouched idle. I wanted to ensure that Níla didn’t look like she would solely depend upon the Wyvern for protection, so I created a few animations like this and the bow shot to show her armour, weapons and rigs off.
Similar to the idle pose above, I created this shot to show off the bow, it’s rig and the arrow.
Following these animations I made another standing idle for Níla and then started developing some dioramas for the shots that were stationary or had animation in them that didn’t require the characters to move from the position.
Planning/Assigning Time For Tasks
Overall, I feel I planned my schedule very well. I have completed the tasks I set out to in my pitch and I have also achieved a variety of my stretch goals. For working entirely as a personal project and wanting to ensure that I did everything myself, I feel I have been successful.
I planned out roughly how long I wanted to spend on the various areas of my project at the start and I adjusted it throughout based on what I deemed most important. I ensured that I spent plenty of time in the design/conceptualisation phase at the start. This meant that I was able to develop my ideas and come up with designs that I was truly happy with. During this time I killed two birds with one stone as I created my base meshes for both characters (from spheres) which I then used for draw overs to improve my concepts. I then was able to jump straight in to the creation process with my base which I could then alter easier to make it look like the concept (since it was used for the drawover). Regarding the creation of both characters, I knew I’d needed to spend longer on Níla to achieve more of a human likeness. Therefore, I adapted my plans to allow for more time to work on her and get her looking how I wanted her to. Having the experience of completing the various stages of the creation process with Níla meant that I was able to repeat the same processes with Estrel and learn from mistakes that I made during the creation of Níla. I also found various ways during the sculpting and texturing processes to speed up my workflow which came in very handy whenever making Estrel and my weapons.
Rigging was something I knew I had struggled with in the past due to time pressures, this was something I didn’t want to happen again. Therefore, to avoid unnecessary added stress I allowed for additional time during this process and I used MGear to create my base rig for Níla (which sped up the workflow substantially, although ending up with it’s own new types of issues). Through planning each step of rigging Estrel, taking my time to test things out, I ended up completing the rig much faster than I anticipated, and I learned a lot from doing it (including ways to simplify problems I had ran into in the past).
Environment wise, I used Quixel assets a lot to create my dioramas and environments. This allowed me to take less time creating rocks, leaves and plants and spend more time assembling, lighting and working on more important aspects of the scenes. I tried to allow for some time to learn Unreal as well and look up Unreal Engine tutorials which ended up being extremely useful. However, I was more comfortable with Marmoset, so I used it as a lot to create many of my lighting setups, dioramas and final renders.
Obviously since I was creating game characters, I was going to be using Real-time rendering – meaning that the end rendering stage would be significantly reduced and it allowed me to commit more time that would have been needed to render into other areas such as creating environments. This also allowed me to re-render things that may have needed to be left as they were if I was rendering normally (e.g. with Arnold on Maya).
Regarding animation, instead of creating a story, I set myself a few different game-style animations that I wanted to create and that I knew would be key to my characters if they were in a game. Since they were stand along pieces of animation, this allowed me to add as many animations as I wanted/had time for and meant that I would have a lot of variance within my project. Furthermore, I was able to spend more time on each animation to make them work and look right, rather than aiming to create a short story and potentially having dodgy sections of animation. Looping animations can also be quite satisfying to watch and can make for great social media posts.
Implementing feedback
Back Normals –
One of the major issues that was posinted out during my feedback was the normal detailing on the back of Níla. In order to maintain a high level of detail within the head and face, I split them from the body into their own UV set/texture (as they do with many triple-A game characters). Therefore, while texturing the body and head, I was actually doing them separately and must have not given them the same normal map intensity/detailing. (Alongside this, since the head had significantly more UV space it benefitted from a higher detailed bake from my high poly ZBrush version.)
However, I was able to reduce the effect of the normal map using Photoshop and adjusting the brightness and contrast. This video by Vladimir Leleiva explains it well (click here for link), except I did it in reverse obviously. I also masked out particular areas that were particularly intense and repeated the process until I felt they looked better.
Here is an image of the issue and the fix (bare in mind this is under extreme light to highlight the problem, under normal lighting conditions it’s not as extreme).

As you can see the transition for the neck to the body is much more consistent and realistic regarding the intensity of the normal map and texture.
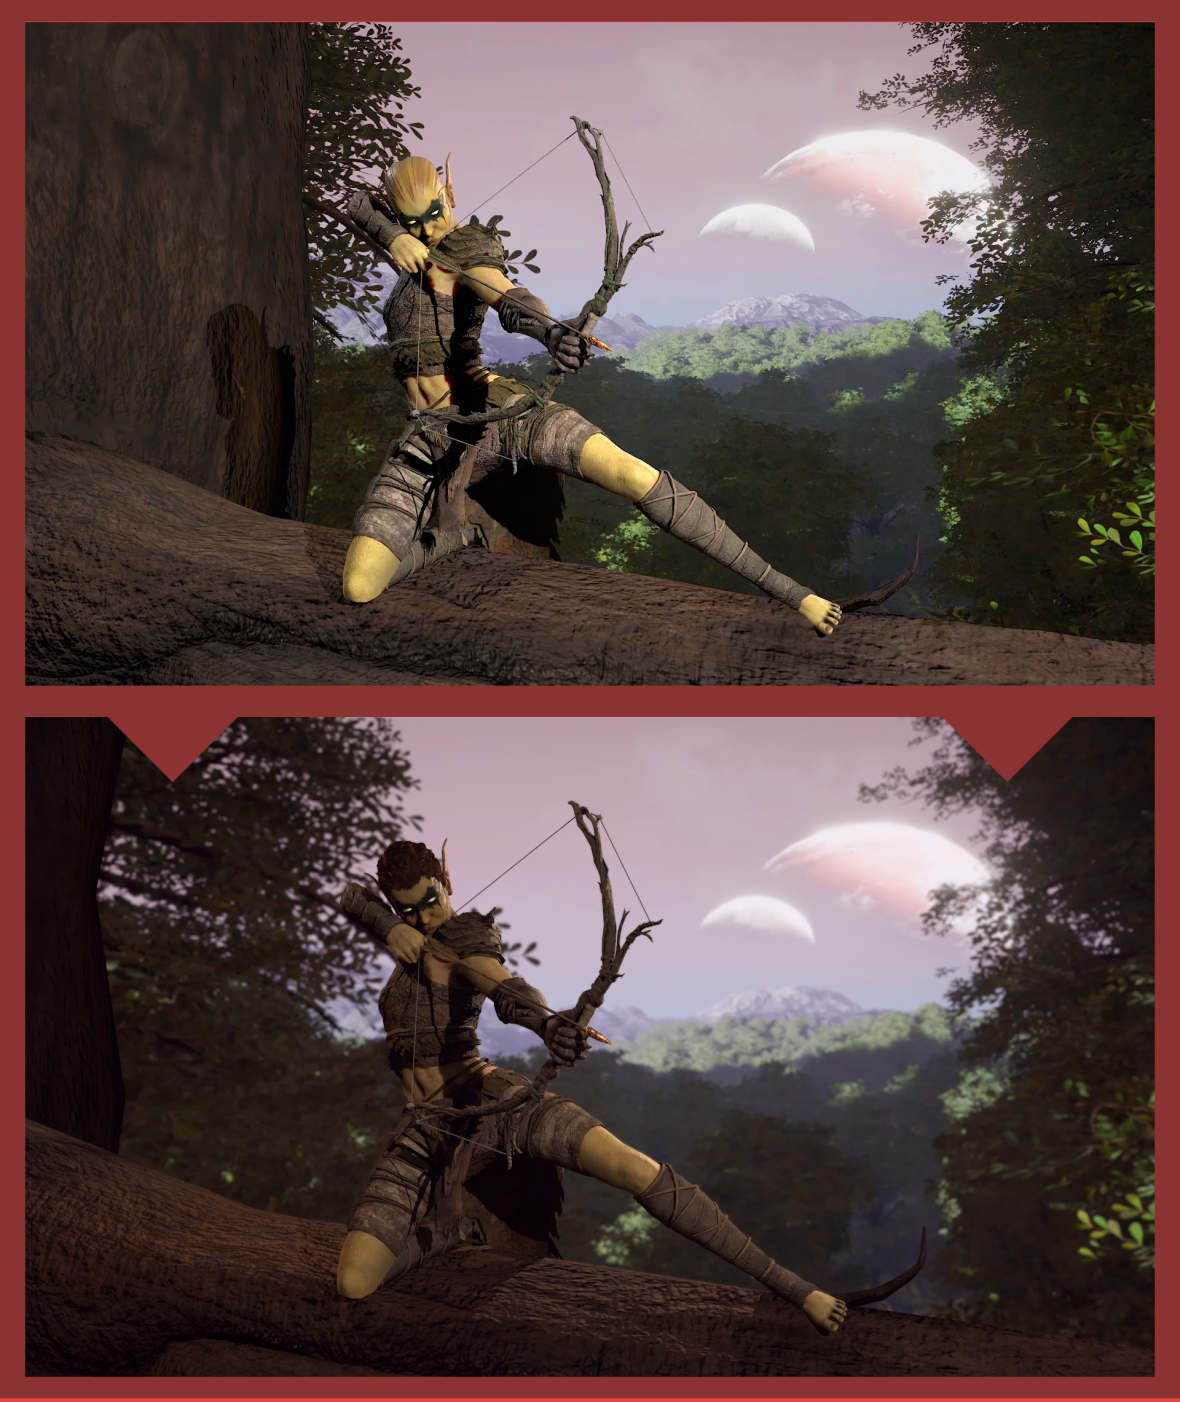
Lighting in the treetop scene –
I altered this shot in a number of ways – It was pointed out that the lighting in the background looks more like it would be hitting her from the back instead of the front (at more of a sunset sort of time). I also adjusted the position of the main part of the tree to expose more of the background and improve the composition. I attached her hair to this older version of my rig that I used for this shot to maintain continuity (at the time of creating this initial shot, her hair wasn’t created) . To ensure that she was still the focus, I adjusted the camera settings to slightly blur the background as well. However, compositionally she still is the primary focus of the scene.
Although she is less lit and her detailing isn’t as obvious in this shot, I do feel that this has definitely improved the shot and improves the ‘believability’ of the shot itself.
Dirty Feet
Although dirty feet were a good suggestion for a wood elf character originally, I decided not to implement it considering how I wanted to showcase my game character. With research into game characters and character creation, many don’t originate with dirt and they avoid the use of it – games that do, only utilise it whenever the character interacts with an object/area that would apply that sort of effect and it often fades away shortly after the character leaves the object/area. E.g. when a character walks through a shallow river they might end up with wet gear up until wherever the water was able to reach, but within around 30 seconds the effect will have dissipated. It is similar with dirt and I didn’t necessarily want my character to have feet permanently caked in dirt.
Below is an example from Ark: Survival Evolved –

Ark: Survival Evolved character creation
Below is another example from Star Wars: Jedi Fallen Order (a recent triple-A game release in 2019), the characters boots aren’t covered in dirt even though he has just came out of a forestry area and he and his robot companion are in a load of murky water (in the following image).
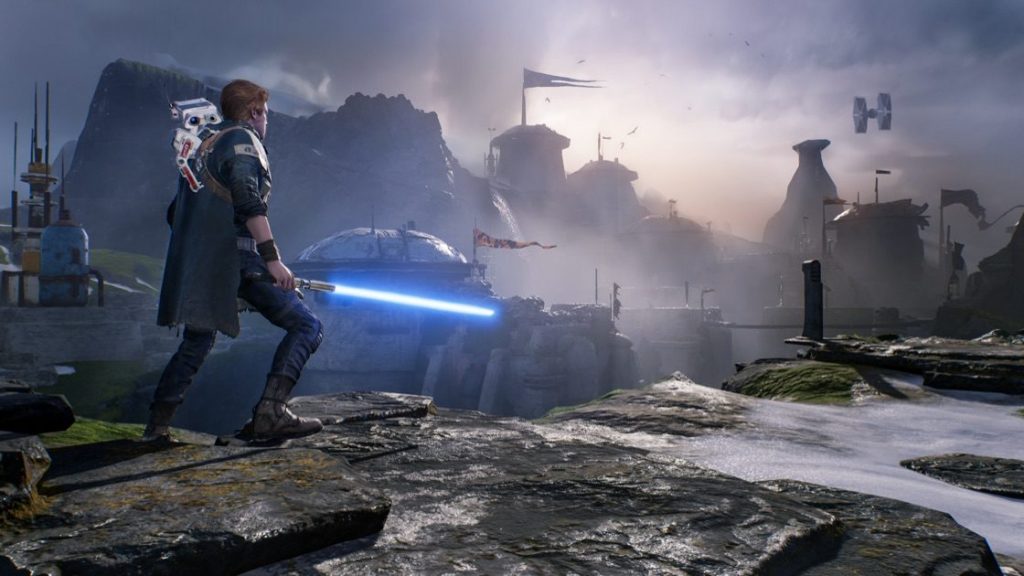
Star Wars: Jedi Fallen Order image
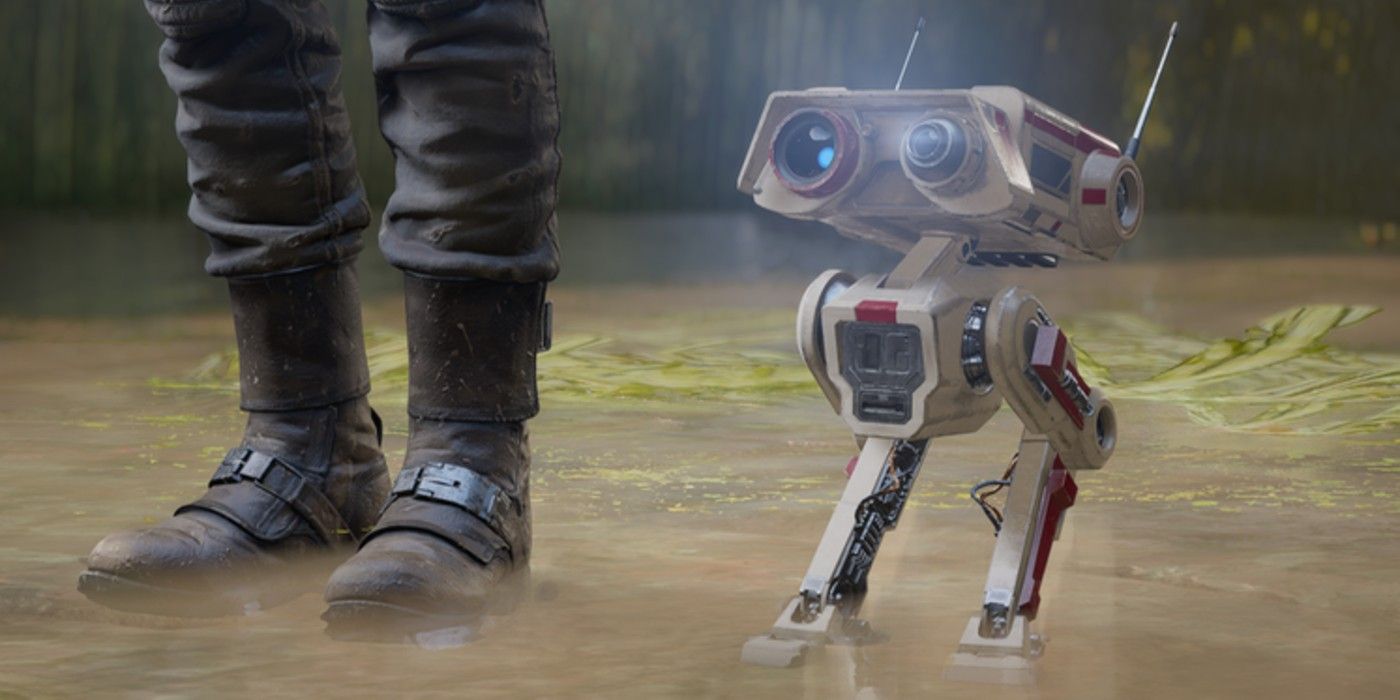
Star Wars: Jedi Fallen Order image of robot and boots
Her feet are originally a bit grubby (particularly the soles of her feet) but I didn’t want her to look really dirty and her having dirt brown feet would not only make her look not clean, it would also take away from the design of the footwear that I created for her. Regarding the changes to her footwear/armour, these are edits I would like to make, but simply ran out of time – her boots do have some slight colour variation, but I would have liked to add more wear and tear (including physical tears with threads) and possibly more leaves or fur around the top of the shinguards. These will be changes I might be able to make when revisiting this character after the deadline.
Thoughts, Conclusion and Final Version…
Overall, I am very pleased with the end result of my project. Setting out with my personal project, I aimed high at the start of my project during the pitch stage, setting myself a variety of tasks and ambitious stretch goals for the project – and I am glad I did so, it meant that I constantly had something to do. I personally feel that I maintained that high standard that I set out within the beginning throughout each stage of my project.
Spending the majority of the first couple of months developing my character designs and creating the basemeshes (from nothing) I feel was very beneficial. It allowed me to push their designs, make them unique and gave me a great basis to work from when it came to the creation of the final 3D versions.
Project Níla has been the longest project that I have worked on, and I have enjoyed creating two entire characters from literally nothing to fully fledged and animated AAA-Game style characters (alongside their weaponry and environments). I have learned so much from this project and I am pumped to both expand upon and put my knowledge to good use within the industry and my future projects.
Therefore, I present to you the final version (submission version) of my major project (set to unlisted, so it can only been seen here/with the link) –
